Pages

Monday, January 10, 2022

How to Check Battery Health on Your Android Device?

Do you worry a lot about the well-being and potency of your smart device’s battery? Want to check the battery health of your smartphone or computer? Battery health plays a major role in the functioning of any smart device. The health of the battery on your device also determines how much of a charge it can hold and for how long. As your device gets old, the battery starts to degrade. And that is why you should keep track of the battery health on your device. Whether it’s an Android smartphone or a tablet, all the Android devices come with excellent battery backup. Also, if you want, you can easily change the battery health of your Android device. Do you know you can get information about the battery health of your Android device?

Are you also a user of any Android device and wish to know how to check battery health? If you wish to know about the battery health of your Android smart device, you will have to read this full post. Here, you will be provided with the method using which anyone will be able to check the battery health level on their Android smart device. So, please go through this full post.

Checking the Battery Health on an Android Device

Checking the battery health of an Android smartphone or tablet is a straightforward task for anyone. There are multiple methods that you can follow for this. Even though Android provides a lot of information regarding battery usage, but there is no straightforward way to check the battery degradation. Here, you will see the most straightforward method applying which you will be able to track the battery health of your Android device.

Some Android devices allow you to check the battery health using hidden menus. If you find no issues with the battery on your device, there is no need to worry about it. You will have to go through some simple steps to find out about the battery health of your Android device. So, it’s finally time to get straight to the technique.

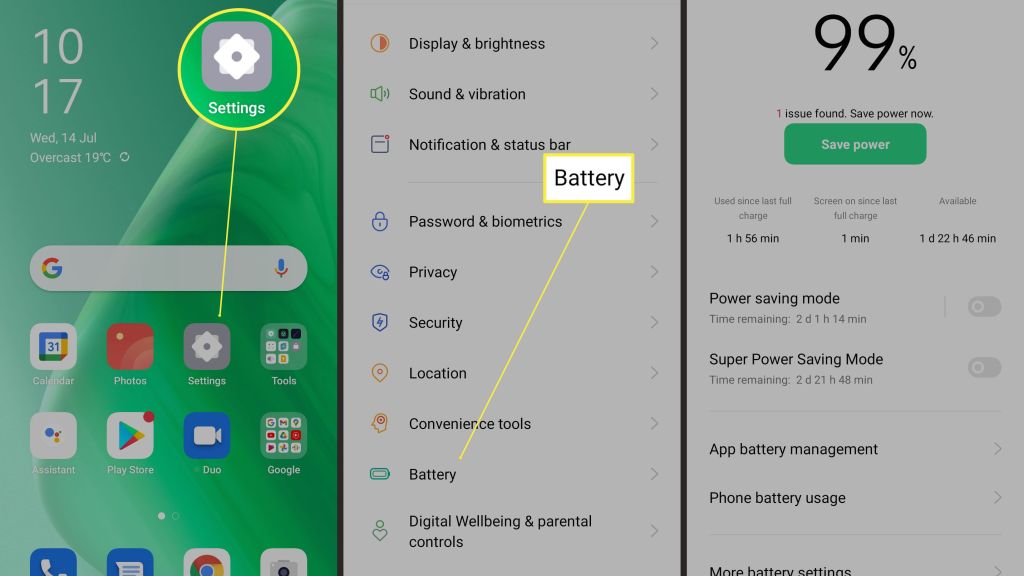
Method to check the battery health of an Android device

Go through the steps to check the battery health of your Android smartphone or tablet:

  • To start with the method, first, you will swipe down from the top of the screen to bring the quick settings tiles.
  • From the notification panel, tap the gear icon at the top left corner of the screen to get to the Settings window.
  • After the Settings app opens on your screen, keep scrolling down to select the option of “Battery and Device Care.”
  • And when you get to the Additional Care section, you will have to select the option of “Diagnostics.”
  • Now, on your smart device, you will see a bunch of options for things on your screen.
  • You will have to tap the battery status icon to proceed further. You will now be able to see some information about the battery. And this is all you will need to do to check the battery health of your Android device.

So, this was all about getting the information on the battery health of an Android device. Make sure you follow the steps carefully. And please stay connected to us for further updates by visiting our official website.

Visit: Rollo.com/setup

Source:https://rolloprintersupdate.com/how-to-check-battery-health-on-your-android-device/


A Complete Guide on Fixing the “program not responding” Error on Windows 10

When you are trying to open any program on Windows 10, and after some time, it freezes, then suddenly the “Program Not Responding” appears on your screen. You cannot shut the screen in this situation and cannot use any options. Many users are complaining about this error and struggling to find its solutions. Here are some instructions provided below.

Update your Windows 10 to Fix the Programming Error on Windows 10

If you wish to update Windows 10 to resolve this error, you need to execute the effective solutions below:

  1. Navigate to the Windows Search section on your PC.
  2. Then input ‘windows update’ and select the OK button to launch the screen.
  3. You should click on the ‘Automatic’ option through the drop-down menu of Startup Type, whether that is not already chosen.
  4. Now, hit the Apply and then OK buttons to verify the fresh settings.

Perform System File Checker to Fix the Programming Error on Windows 10

If you are attempting to execute the system file checker but you can’t, try the directions given below:

  1. Hold the Windows and X buttons simultaneously on the keyboard to invoke the Win + X menu.
  2. Thereafter, insert ‘sfc /scannow’ and select the OK button to start the scan process.
  3. This process takes a minimum of 15 minutes, and once finish the scan process, the Command Prompt screen might state, ‘Windows Resource Protection found corrupt files and successfully repaired them.’
  4. Now, shut the Command Prompt, then reboot the Windows.

Run DISM Scan to Fix the Programming Error on Windows 10

If you perform a DISM scan on your device, check out the quick resolutions below:

  1. Open the Command Prompt as administrator on the system.
  2. Thereafter, insert the pursuing line and hit the Enter button: DISM /Online /Cleanup-Image /RestoreHealth.
  3. Now, the DISM scan will begin. The scan takes a minimum of 20 minutes.
  4. After completing the DISM scan, check whether the issue still shows.

End Windows Desktop Manager Task to Fix the Programming Error on Windows 10

If you would like to end the Windows Desktop Manager task, continue with the possible instructions below:

  1. Hold the ‘Ctrl + Shift + Esc’ keys simultaneously on the keyboard to invoke the Task Manager.
  2. Once the Task Manager launches, find the ‘Windows Desktop Manager process,’ right-click on it, then pick the End Task through the menu.

Make Changes to the Registry to Fix the Programming Error on Windows 10

If you are trying to make changes to the registry, go through the effective solutions stated below:

  1. Hold the Windows and R buttons simultaneously on the keyboard to launch the Run section.
  2. After that, input ‘regedit’ into it, select the OK button and hit the Enter key.
  3. Navigate to the File option and then choose the Export option.
  4. You should change ‘Export range’ to All. 
  5. Then input the preferred name of a file and select the button of Save.
  6. Once you have done, you will have a backup of the registry ready
  7. If anything goes incorrect after changing the registry, perform the backup file to restore the registry to the default state.
  8. Select the Edit option and then go to the Find option.
  9. Type ‘CoreParking’ or ‘54533251-82be-4824-96c1-47b60b740d00’ then select the Next button.
  10. Now, remove the buttons associated with CoreParking. 
  11. Redo the 4th and 5th steps to locate each button associated with CoreParking and remove them.

Visit: mcafee.com/dellactivation

Source: https://mcafeedellactivation.co.uk/a-complete-guide-on-fixing-the-program-not-responding-error-on-windows-10/