Pages

Showing posts with label CRICUT. Show all posts

Tuesday, December 13, 2022

8 Content Marketing Tools You Should Be Using In 2022

 8 Content Marketing Tools You Should Be Using In 2022

Content marketing has evolved day by day with online marketing; thus, the need for an effective tool can be felt to boost content. Many tools serve tons of different purposes, from content creation to production, promotion, optimization, and a lot more. Please note that no tool can replace the work of talented and intelligent humans; however, having the right tool can help you get the job done in a better, easy, and more efficient way.

This post has summed up the best content marketing tools under several categories to cater to the different needs of a content marketer.

Google Tools

When content topics come up, we can’t neglect the giant Google. Google actually offers a ton of tools – keyword planner, keyword research, Google trends, and Google search console for different purposes for boosting content.

  • The keyword planner is responsible for conducting keyword research
  • Google analytics tools give an in-depth overview of content performance over a certain period.

The best part about these Google tools is that they all are free.

Hubspot

Hubspot offers various tools and systems to grow along with the business. When it comes to content marketing, this tool serves the best by consolidating multiple content marketing tools into one centralized location. Many of the tools offered by Hubspot are free to try. In addition, it includes a world-class CMS and powerful marketing automation platform, allowing users to centralize everything within a free CRM.

In short, Hubspot has come up with an outstanding solution to help individuals and businesses build a perfect content marketing program.

WordPress

Those interested in writing blogs with ease and efficiency can find WordPress the right tool for themselves. Using this tool, they can create a website or blog. WordPress is an excellent platform for creating content, uploading content, and tracking visitors. It includes many plugins that help content marketers optimize the complete marketing process. You can find a free version of WordPress with three gigabytes of storage in it.

Grammarly

The truth is editing and proofreading content is as important as creating content. Grammarly is liked by most content marketers because of the easy access across multiple communication mediums starting from email to documents and social media. This tool aims to reduce the error rate by 50-80%. In Grammarly, there is a plan for basic grammar and punctuation as well. Grammarly extension works with browsers like Chrome, Safari, and Firefox.

Yoast

If you’re writing SEO-optimized, you can find Yoast, the best SEO WordPress plugin available. In short, this tool offers an all-in-one WordPress plugin for SEO and helps you with almost everything, starting from optimizing content for a keyword, and previewing meta-descriptions and URL slugs. You can edit content. In addition, it suggests relevant internal links too. Colour indication like red, yellow, and green makes it easy to find that the content has been optimized correctly.

Buzzsumo

Conducting research is a part of content writing. Buzzsumo allows writers to carry out content research and track performance metrics as well. When it comes to multi-purpose content marketing research tools, it is the best. You can use this tool to find trending topics and headlines that receive the most engagement. This tool helps analyze content, what content is performing the best for any topic or competitor, and more. One of the main things about this tool is that it includes great influencer reports.

Ahrefs

For doing basic SEO research, consider going for Ahrefs. It’s the favorite tool among writers as it allows for tracking the rankings of keywords, analyzing competitors’ keywords, traffic, and more. Its keyword research and site analyzer features are just out of the box.

Hotjar

Are you curious to know the visitor behavior on your website? Business owners can use Hotjar to get an accurate read related to it. This tool works great for marketers as well as designers and researchers. In it, qualitative tools like an on-site poll, surveys, and session replays are available to make compelling content. With quantitative tools like heat maps, you can see where your visitors are clicking and scrolling.

Though many tools are available, the above post discusses some of the best tools for content marketing needs. Try them out and find which works best in enhancing your content strategy and execution.

Frequently Asked Questions

What Is a Content Research Tool?

Content research tool actually helps writers understand what their target audience is searching for. Certain tools help find relevant information and help writers create compelling and accurate stories.

What Tools Are Mostly Used by Content Strategists?

A few of the most commonly used tools by content strategists are :

  • SEMrush
  • Hubspot
  • MarketMuse,
  • Internal style guide,
  • Survey Monkey.

What is The Best Content Strategy?

The best content strategy includes identifying the target audience, selecting high-volume keywords, focussing on social listening, etc.

What are Some Popular Types of Content?

The most popular types of content are:

  • Webinars
  • Guides and Ebooks
  • Emails
  • Case studies
  • Press releases
  • White papers
  • Video content

Visit: cricut.com/setup
www.cricut.com/setup

Source: https://cricutdesignmaker.com/8-content-marketing-tools/

Tuesday, July 19, 2022

How To Use Cricut Foil Transfer? [A Comprehensive Guide]

 Did you hear the news? Cricut brand released a new tool – the Cricut Foil Transfer System, and it’s great! Most recently introduced Cricut tools are explicitly created for Cricut Maker, so Cricut Explore owners will be pleased to know that the Cricut Foil Transfer Tool works on all Cricut machines!

cricut.com/setup

We had a chance to test and play with it for a few weeks before the Cricut foil transfer tool was introduced to the public, and we’ll share all the inside scoop with you today!

So, what is the Cricut foil transfer? How does it work? And how to use Cricut foil transfer

? We’re here to cover all that and show you some fun projects.

cricut.com/setup

What is Cricut Foil Transfer, and How Does It Work?

The Cricut Foil Transfer comprises 2 main components – the Foil Transfer Tool and the Foil Transfer Sheets, which are used to add dazzling foil accents to projects. The Cricut Foil Transfer has 3 interchangeable tips (fine, medium, and bold) that provide a variety of line weights on a wide assortment of materials.

Cricut Foil Transfer Sheets are available in 2 sizes – the large 12×12 sheet (gold/silver) and the smaller 4×6 sheet (gold, silver, emerald, aqua, and purple). The Cricut Foil Transfer uses a pressure system to activate the foil and transfer it to materials.

cricut.com/setup

Inside the Cricut Foil Transfer Kit, you will find the Cricut Foil Transfer Tool with 3 assorted tips, 12 – 4×6 sheets of foil, and strips of specially formulated tape that hold foil securely.

The Cricut Foil Transfer has a plunger button at the top that lets you easily swap different tips. Each tip is magnetically attached to the tool’s interior, so it’s easy to remove and change as required.

The 3 individual tips are marked with lines near the bottom of the shaft to separate them: one – fine point, two – middle point, and three – bold.

Steps To Use Cricut Foil Transfer

cricut.com/setup

Using the Cricut Foil Transfer is as easy as 1-2-3!

  • Create your project at Cricut Design Space (App).
  • Set the Cricut Foil Transfer Tool and the right tip into the machine.
  • Follow the foil transfer sheet to its original material, press the button, and watch your machine work its magic.
cricut.com/setup

Follow the steps to use the Cricut foil transfer to create a foil greeting card. Start with a sheet of cardstock on the Cricut mat.

cricut.com/setup
  1. First, set the Cricut Foil Transfer in the “B” tool carrier of the machine. In this case, we also use the Cricut scoring stylus in the “A” carrier to make a greeting card.
cricut.com/setup
  1. Next, open the “Missing You Card” design in the Design Space. Ensure your design is set to “Foil” in the LineType drop-down menu in the top toolbar. If everything looks right, tap the green “Make It” button in the top-right corner of the screen.
cricut.com/setup
  1. After that, place the design on the mat, so it faces away from the edges. Foil transfer sheets work great when you leave at least a 1/4″ gap between the edges of the foil and the edges of the design, and you also need a little space to tape the foil to the material. If any part of the design is covered with tape, the foil will not transfer properly in those areas.
cricut.com/setup
  1. Then, we used heavy cardstock to choose the base material and loaded the mat into the machine. In the left sidebar panel, you’ll see the order in which the tools will be used—first the scoring stylus, then the Cricut foil transfer tool, with the fine tip, followed by the bold tip, and ending with the cutting blade. Now, tap the flashing Cricut button on the machine, and the scoring stylus makes a score line for the cards to be folded.
cricut.com/setup
  1. Next, cut the foil transfer sheet to size (larger than the design but smaller than your base material), and tape the foil (bright colored side) to the base using the provided tape strips. Don’t remove the mat from the machine! Ensure the foil is smooth and secure on all sides.
cricut.com/setup
  1. Now, tap the flashing Cricut button to start foiling.
cricut.com/setup
  1. After foiling with a fine tip, the machine will stop, and the software will prompt you to switch to a bold tip. Remove the Cricut Foil Transfer from the “B” carrier, change the tips, and replace the tool in the machine. Don’t remove the mat from your machine.
cricut.com/setup
  1. When the foiling process is done, carefully remove the tape and peel off the foil transfer sheet to show your stunning foil design.
cricut.com/setup
  1. Change the foil transfer for a fine-point blade and cut out the card. With the Cricut Foil Transfer, you can easily create elegant foil cards for every occasion.
cricut.com/setup
Visit: Install Cricut explore air 2

www.cricut.com/setup

Source: https://setupexplore2.com/how-to-use-cricut-foil-transfer/

Thursday, July 14, 2022

How To Use Cricut Explore Air 2? [The Ultimate Guide]

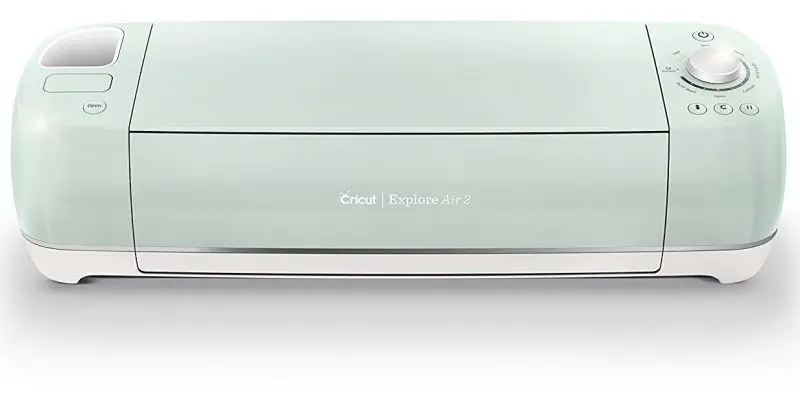
 So you just bought a new Cricut Explore Air 2 and are wondering how to use Cricut Explore Air 2? Cricut Explore Air 2 is a great DIY cutting machine that can cut, write, and score a wide variety of materials for you to create projects.

Maybe you are contemplating a purchase and want to know about the features of Cricut and how this Cricut Explore Air 2 differs from the previous machines? We’ll start at the beginning: unboxing this machine (mint green), and we’ll end with how to connect Cricut Explore Air 2 with a PC, Mac, and iPad.

If you’ve an old Cricut Explore Air model, don’t worry. There are some differences between the models and how to use Cricut Explore Air 2.

Follow the Steps To Use Cricut Explore Air 2

To use your Cricut Explore Air 2 machine, follow the steps given below:

First, Let’s Unbox Cricut Explore Air 2

Let’s ensure you are not missing any items. If nothing is included, return your Cricut Explore Air 2 to the store you purchased it from or contact Cricut Support for a quick replacement. If you’ve something extra, well, that’s a nice bonus.

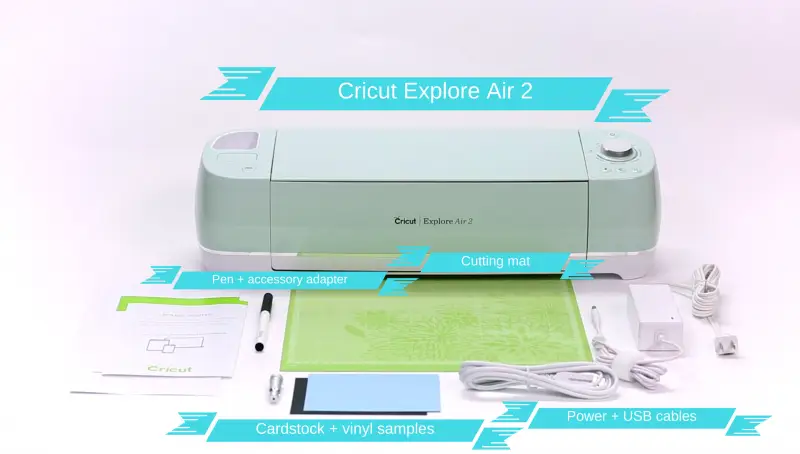
Your package should include at least the following:

  • Instruction Manual
  • Cricut Cutting Mat
  • Cutting Blade (Pre-installed)
  • Cricut Explore Air 2 (in case you’re missing it, the box was probably too light)
  • Power + USB Cord
  • Silver Pen + Accessory Adapter (Pre-installed)
  • Cardstock + Vinyl Samples

Note: There are many different kits available (Premium Vinyl, Tools Kit, Ultimate Kit, Complete Starter Kit, Vinyl Starter Kit), so you may have some extra items to include.

What’s the Difference Between Cricut Explore Air and Explore Air 2?

The Cricut Explore Air and Cricut Explore Air 2 machines look alike and have all the same features… What’s the difference? The answer is only color and speed. The Cricut Explore Air 2 has a 2x faster mode machine that works with vinyl, iron-on, and cardstock. It also has 3 pretty colors: Mint Green, Pastel Pink, and Sky Blue. This much only!

Now let’s look inside.

Inside Cricut Explore Air 2

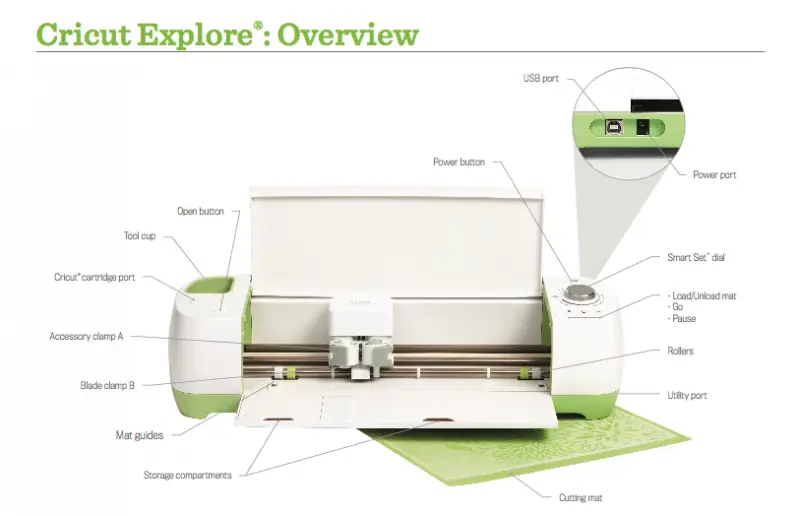
We’ll cover the basic features of Cricut Explore Air 2, some of which are awesome. The overview is of the original Cricut Explore Air, but the layout is identical. Just imagine the beautiful mint finish.

  • Tool Cup: Holds pen, scissors, etc.
  • Accessory Clamp A: It is where the accessory adapter comes pre-installed and where you can insert the pen for drawing instead of cutting. It is also useful for holding the scoring blade.
  • Blade clamp B: The blade comes pre-installed. If you need to change it or remove bits of vinyl, it is what you want to look for.
  • Accessory storage compartment: In addition to the tool cup, the Cricut Explore Air 2 has 2 storage compartments. The small compartment on the left holds extra blade housings, blades, and accessory adapters. It has a magnetic strip to hold the replacement blade secure and free from rot. The large compartment is great for storing long tools/pens.
  • Smart set dial: Spin the dial to choose the material you will cut. It feels great to bend and shows which materials you can cut with 2x time faster mode.
  • Cutting mat: It is sticky on one side to keep the material securely.

A Brief Note on Accessory and Blade Clamps: If you ever need to remove the blade or accessory clamp, simply open the lever and pull out the metal housing. The blade sits on the inside and has a small plunger on top. You can press it down to reveal the magnetically held blade. If you need to change the blade, just take it out and leave the other one in.

To use the pen/marker, simply open accessory clamp A, drop it down, and then close the clamp.

Ok, let’s connect the Cricut machine and install the required drivers.

Steps To Connect Cricut Explore Air 2 With Your Mac/PC/iPad

Even though the Cricut Explore Air 2 machine can be used wirelessly, we’ll start by setting it up with a USB cable. Begin by placing at least 10″ of the available surface behind it as the cutting mat moves back and forth inside the Cricut machine.

First, plug your Cricut machine in a while connecting the power adapter and USB cable.

Next, switch on the Cricut Explore Air 2 as well as your computer.

Afterward, go to the Cricut website, register a user account, and download the latest plugin software.

Then, run the installer and go to design.cricut.com. Lastly, press the menu bar icon in your top left corner and choose New Machine Setup. That’s it.

Visit: cricut.com/setup

Source: https://setupexplore2.com/how-to-use-cricut-explore-air-2-the-ultimate-guide/

Saturday, July 2, 2022

How To Make a Cupcake Topper With Cricut?


If you love a custom party, you probably love DIY craft decorations like cupcake toppers! Cupcake toppers are a fun and easy way to dress up your simple cupcakes. You can make them in any size, color, style, and design to match your theme. Cupcake toppers with your theme are the icing on the cupcakes! With Cricut machines, you can decorate your parties with DIY craft decorations.

Besides organizing and decorating your house, party supplies are the best craft projects to make with Cricut machines. Today, we will walk through the easiest and quickest party craft project you can do: How to make a cupcake topper with Cricut. There’s no easier way to prepare cupcakes than adding a cupcake topper. The Cricut Design Space has made it easy to make cupcake toppers with Cricut! So, let’s learn how to make a cupcake topper with Cricut.

What Do You Need To Make a Cupcake Topper With Cricut?

Here’s what you will need to make a cupcake topper with Cricut.

  • A Cricut machine or any other cutting machine.
  • A PNG or SVG circle or cupcake topper.
  • High-quality printer paper to print and cut images.
  • Quality cardstock paper for backing favor tags.
  • Lollipop Sticks.
  • A hot glue gun and glue sticks.

How To Make a Cupcake Topper With Cricut?

Here is a complete step-by-step instruction on how to make a cupcake topper with Cricut at home. The first step is time to prepare for your cut.

Working in the Design Space App

  1. First, you must download or make cupcake toppers (usually PNG or SVG) and then open your Cricut Design Space app.
  2. Next, upload the PNG or SVG by tapping “Upload” in the left-hand side menu.
  3. After that, ensure your “Print Then Cut” option is checked so you can see your design on the cupcake toppers. Then, press on Insert.
  4. Now, to create your cupcake topper smaller, shape it by dragging it at the corner side. (Most prefer cupcake toppers to be about 2 inches in diameter.)
  5. Then, duplicate the tag by right-tapping it and selecting “Duplicate.”
  6. Next, under “Fill” in the top menu bar, choose “No Fill” in the dropdown menu bar.
  7. After that, change the color of that backing to the color you want the backing to be.
  8. Then, right-tap and press “Move to Back” on the backing.
  9. Now change the backing piece to be slightly larger than the cupcake topper.
  10. Next, duplicate only the backing, so you’ve one printed cupcake topper and two backing parts.
  11. Lastly, choose all and duplicate as many times as you can on one page.

Printing Cupcake Toppers

Next, the second step is time to print.

  1. Firstly, you have to switch on your Cricut cutting machine and adjust your paper setting to whatever paper you are using (most people usually choose cardstock unless it’s very thick.)
  2. Next, in your Cricut Design Space app, press “Make It.”
  3. After that, press each cutting page to choose what size paper you have.
  4. Then, press “Continue.”
  5. Now, choose the “Print Then Cut” cupcake topper page and press the “Send to Printer” button.
  6. Lastly, select a printer and print.

Cutting Cupcake Toppers with Cricut Machine

Now the third step, cut off side tags.

  1. Firstly, put printed cupcake toppers on your cutting mat.
  2. Next, align the mat on the Cricut machine between the two brackets.
  3. After that, click on the arrow button on the Cricut machine to load the cutting mat.
  4. Then, click on the C button to start cutting material.
  5. When your Cricut machine completes the cut, click on the arrow key to remove the cutting mat.
  6. Next, carefully peel your cupcake toppers off the mat and remove the excess paper.
  7. Now, place the paper you plan to use on the mat to support your cupcake toppers.
  8. Lastly, repeat 2 through 5 steps.

Finishing Cupcake Toppers

The last step is completing the cupcake toppers.

  1. Firstly, you have to hold one of the printed cupcake toppers and use a hot glue gun to apply some glue to the back of your cupcake topper.
  2. Next, center your cupcake topper on one of the backing pieces and attach it.
  3. After that, take a lollipop stick and apply some glue to one side of the top side.
  4. Then, put the circle you glued on the top side of the stick.
  5. Now, apply a little glue on the opposite side of the stick you just pasted.
  6. Lastly, take another backing piece, align it to the front, and attach it to the glue.

Final Words

We hope this blog provides great ideas about making a cupcake topper with Cricut, a beautiful DIY party decoration! So, these are the complete instructions on how to make a cupcake topper with Cricut at home. And thank you for taking the time to read about How to Make a Cupcake Topper with Cricut.

Visit: cricut.com/setup

install cricut explore air 2

cricut setup explore air 2 setup

Source: https://setupexplore2.com/how-to-make-a-cupcake-topper-with-cricut/

Friday, June 24, 2022

How To Add Fonts To Cricut Design Space


Got new fonts and want to learn how to add fonts to Cricut Design Space? Or maybe you want to expand your Cricut font library with custom fonts. This post will show you how to add fonts to Cricut Design Space, so your projects have that unique personal touch.

Good News? Adding fonts to the Cricut Design Space is simpler than you might think. Keep reading to know how to add fonts to Cricut Design Space.

Are you still scrolling through the Font menu in Cricut Design Space, looking for the right font to use for your project? Cricut Design Space has a bunch of fonts. And if you’ve a Cricut Access subscription plan, you’ve also more font options.

But sometimes, you need to find that perfect font elsewhere. And if you want to be able to use downloaded fonts in your projects, you need to know how to add fonts to Cricut Design Space. We will break it down into four easy steps so that beginners can start using their favorite fonts in their designs today!

Here Are the Instructions On How To Add Fonts To Cricut Design Space

To use a new font in Cricut Design Space, you need to download the font and install it on your computer. Once you do, the new font will be open to using in the Cricut Design Space. Here are the easy steps for downloading and accessing a new font within the Cricut Design Space.

  1. Firstly, download the font you want to use with your project. Make a note of which folder the font file is downloaded to.
  2. Now, unzip the font file folder. Then, double press on the individual font file. (Most font files end in .ttf or .otf – we recommend installing the .otf file if you’ve the option.)
  3. After that, once the font is installed, open your Cricut Design Space. (If the Cricut Design Space is already open, you need to close and reopen it.)
  4. Lastly, do a new project, and add a new text layer. Now, choose the Text tool to add a new text box to the canvas. Then, press the font drop-down menu in the top toolbar to adjust the font.

Tip: You can search for a font by entering the name of the font. Also, you can press the “System” filter to show all fonts installed on your computer.

Don’t have a Windows computer? Not an issue. Just scroll down for specific font installation instructions for Mac, iPad, and Android devices.

How To Add Fonts To Cricut Design Space On Windows

Here are the basic steps on how to add fonts to Cricut Design Space on Windows.

  1. Firstly, download the font file. Then, navigate to the Downloads folder, and find the font file you downloaded.
  2. Now, if your file is compressed into a .zip file, then right-press on it and choose Extract to extract the files.
  3. Lastly, press on the right font file, and then choose Install.

(If you are asked to allow the program to make changes to your computer, ensure you trust the source of the downloaded file, and then press Yes.) Now, your font is installed and will be open to use in the Cricut Design Space.

How To Add Fonts To Cricut Design Space On Mac

Here are the simple steps on how to add fonts to Cricut Design Space on Mac in just three steps.

  1. Firstly, you have to download the font file.
  2. Next, if your file is compressed into a .zip file, double-press on the zipped file to unzip your files.
  3. Lastly, double-press on a font in the Finder window; now press on Install Font in your font preview window that opens.

Your font is installed and will be open to using in the Cricut Design Space.

How To Add Fonts To Cricut Design Space On iPad

In order to install fonts on the iPad, you first need to download and install a free font management app. So, here are the easy steps on how to add fonts to Cricut Design Space on iPad.

  1. Firstly, download and install a font manager app like iFont.
  2. Next, download the font file. Then Unzip the file if required.
  3. After that, open iFont and choose Font Finder. Then, select the Open Files tab and navigate to the font file you want to install. Now, choose the file.
  4. Then, choose the Installer tab. Click on the Install button next to the font you want to install. Now, click on Continue, then Allow.
  5. Now, close iFont and open the Settings app. Click on the downloaded profile. You will notice the font you want to install. Click on install. If you see a “Profile is not signed” warning, press Install.
  6. Lastly, you should see the message “Profile installed.” Now, press on Done.

Now, your font is installed and available for you to use in the Cricut Design Space.

How To Add Fonts To Cricut Design Space On Android

In order to install fonts on an Android device, you first need to download and install a free font management app. So, here are the quick steps on how to add fonts to Cricut Design Space on an Android device.

  1. Firstly, download and install a font manager app like iFont.
  2. Next, download the font file. If the file is compressed into a .zip file, extract the file. Then go to the Downloads app, and find your downloaded file.
  3. Lastly, open iFont and then go to My > My Font. To preview the font, open it and install it on your Android device. Now, press on Set to complete the installation.

So, these are the detailed step-by-step instructions on how to add fonts to Cricut Design Space on your Windows, Mac, iPad, and Android devices.

Visit: cricut.com/setup

Install cricut explore air 2

Source: https://setupexplore2.com/how-to-add-fonts-to-cricut-design-space/

Wednesday, May 11, 2022

Cricut Customer Service: How To Fix Computer Not Finding My Cricut

If you have discovered yourself thinking about Why is my PC device is not finding my Cricut, you came to the correct place. Some numbers of operators have asked a similar question. It can be irritating if you cannot wait to begin your projects or designs. The only thing standing by your side is the setup of your Cricut device, which is provided by the Cricut customer service at any time. Even though the operation should drive smoothly by just agreeing to and following the on-screen instructions, sometimes conditions appear in which that is not possible.

We are here to solve your queries very quickly and easily by giving you the best and most reliable steps or methods. If you are a crafter and make an innovative design on a daily basis, but sometimes your computer device does not find your Cricut device, then you come to a good place. Issues mentioned above, in this blog, we will explore a few of the best and perfect fixes regards to this problem. Read on to discover more.

Methods To Fix Computer Not Finding My Cricut Via Cricut Customer Service

If you are also facing this problem with your device, then all you to do is that you have to follow all the given methods carefully. These all methods and steps are the best and most reliable to use to solve these issues.

Solution 1. Make sure that your Windows firewall is not blocking the device

  1. Press on Cortana search box -> enters Windows Firewall -> Give permission to the app through Windows Firewall.
  2. Go to the Windows Firewall settings -> press on Change Settings.
  3. Move through the list, and tick right to the boxes for the Cricut software -> choose both Private and Public.
  4. If you cannot get the Cricut software registered ->, press Allow another app -> move to the installation folder of your Cricut software -> to attach the executable file, -> repeat step 3 of this method.
  5. Press OK.

Solution 2. Ensure that you connect the USB cable or your Bluetooth is turned on

  1. You have to make sure that your Cricut device is switched on and not more than 3-4 meters aside from your PC.
  2. Click Windows key + X key on your keyboard – > choose Settings.
  3. Press the Devices option.
  4. Ensure that Bluetooth is togged on -> press Add Bluetooth or another device.
  5. Choose Bluetooth and wait for your computer to determine the Cricut device.
  6. Choose the device -> type the PIN 0000 -> choose connect.

In order to attach your Cricut device through a USB cable, simply attach the cables to both of the peripherals and agree and follow the on-screen instructions to install the needed USB driver.

Solution 3. Simply install the USB driver manually

If, for any reason, you cannot finish the USB installation of the driver as given above. You will require to perform this action manually. Carefully follow these simple steps to do so:

  1. Click the Windows key + X key on your keyboard -> choose Device Manager.
  2. Go to the Device Manager -> discover the Cricut device in the list -> right-press it -> chooses Update Driver Software.
  3. Choose the Browser on my computer for the driver software.
  4. Enter %APPDATA% inside the search box -> choose Browse.
  5. Go to the explorer window -> move to AppData -> Roaming -> Cricut Design Space -> Web -> Drivers -> Cricut Drivers.
  6. When the folder is chosen -> press ok -> press ok.
  7. At last, restart your computer device for the changes to take effect.

Please feel free to contact Cricut customer Service if this guide helped you fix your problem by using the connect section.

FAQs

How do you solve the Cricut Design Space not working?

Cricut Design Space application is not working. The Design Space program is an associate app that works with Cricut Explore and Cricut Maker family smart cutting devices.

Solution 1. Verify whether your PC meets the Minimum Requirements.

Solution 2. Inspect Internet Connection.

Solution 3. Shut off the Program and clean the Browser Cache.

Solution 4. Clear DNS Cache.

When I press to make it on my Cricut device, nothing occurs?

Make sure that the cutting device mat has been filled into the device. Some switches are not enabled unless a mat is filled into the device. Try utilizing a different cartridge. If the keypad switches respond with a different cartridge, contact the Cricut Customer Service through one of the options below for further assistance.

Can you utilize the Cricut Design Space without a subscription plan?

Cricut Design Space is free to utilize, and it is not optional: it is the only route to use a Cricut device. You do not require Cricut Access in order to use it. There are few limited free images, fonts, and ready-to-make designs already in Design Space that you can utilize without a Cricut Access subscription at all.

Visit: cricut.com/setup

Source: https://cricutusasetonpc.com/cricut-customer-service-how-to-fix-computer-not-finding-my-cricut/