Pages

Tuesday, April 28, 2020

How to Delete Old iPhone Backups in iTunes

The backup feature of the iPhone through iTunes is one of the most vital and popular features of Apple. However, there is one flaw in it; once the new backups have been done automatically, the old ones keep on acquiring the free space on the Mac device. Thus, it is necessary to delete old backups to get extra space on the Mac. In the subsequent blog, we are going to share with you a specific guide to delete old back-ups in iTunes. The following process is a bit lengthy, so it is suggested to be aware while reading the following article. There are three methods to accomplish this process, and below, we have individually brief out the process of each one.
Deleting iPhone or iPad Backup on MacOS Mojave
The users who are intended to delete the old backups in iTunes on MacOS Mojave should obtain assistance through the below-written instructions.
  1. The users have to click on the icon of iTunes from the Dock.
  2. After that, the users need to tap on the option of iTunes.
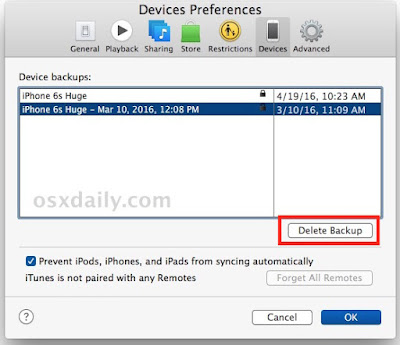
  3. Then, the users require to press the option of Preferences.
  4. After that, the users have to select the tab of Devices.
  5. Then, the users need to pick the back that they seek to delete.
  6. After that, they need to choose the option of Delete Backup.
  7. The selected backup has been successfully deleted.

Deleting iPhone or iPad Backup on MacOS
The users who are intended to delete the old backups in iTunes on MacOS should obtain assistance through the below-written instructions.
  1. The users need to tap on the option of Finder from the Dock.
  2. After that, the users require to choose the iPad or iPhone option.
  3. Then, the users need to press the icon of Manage Backups.
  4. After that, they have to pick the backup that they seek to delete.
  5. Then, they need to click on the option of Delete Backup.
  6. After that, they have to tap on the symbol of Delete.
  7. The selected backup has been successfully deleted.
Deleting the Software Update Files
Several users must be unaware of the fact that the software updates in their iPhones and iPad acquire some of the space of iTunes even after they get installed. Below we have provided specific instructions to delete those software updates files that are acquiring a free space on your device.
  1. The users need to choose the option of Finder from the Dock.
  2. After that, the users have to select the icon of Go from the main menu.
  3. Then, the users require to press the Alt key on the keyboard.
  4. After that, the users need to tap on the option of the Library.
  5. Once the users tap on the Library option, then they need to select iTunes.
  6. After that, the users have to pick the icon of the iPhone Software Updates.
  7. Once the users successfully choose the iPhone Software Updates, then they need to select the appeared file of the iOS update.
  8. The selected backup has been successfully deleted.
Conclusion
Apple is famous for its mesmerizing devices. However, there are various limitations in them, but still, they considered the best. One of the most irritating limitations is space issues in their devices. Thus, in the subsequent blog, we are going to share with our users three possible methods to delete the old backups from iTunes. We believe that the users who are here to find a resolve for subsequent issues must fix it through the solutions written in this blog.
Laura Barton is a creative person who has been writing blogs and articles about cyber security. She writes about the latest updates regarding mcafee.com/activate and how it can improve the work experience of users. Her articles have been published in many popular e-magazines, blogs and websites.

How to Make A Coconut Flask in Stranded Deep

Beam Team Games has finally managed to make a deal with PS4 and Xbox One. AS their popular survival video game, Stranded Deep has finally arrived on them. It was a much-awaited game for the past three years for the gamers of PS4 and Xbox One, and now it has finally been appeared. As it is a surviving game, there are pretty harsh aspects included in it. One of the problematic issues is to drink water. The gamers waited for the rain to happen in the deserted area where they have been stuck, and it appears through, but the real problem lies in storing the water. The gamers have to make a coconut flask for storing water, and in the following blog, we are going to share with our players a specific workaround to craft it.
How to Create a Coconut Flask
Various essential materials are needed to craft the flask, and one of the significant prerequisites is the Coconut. The gamers need to obtain one, and they can easily find it in the crafting menu of the game. Once they reached there, then they need to go to the menu of consumables. Gamers can also obtain other essential items from the menu, along with Coconut, such as antidotes.
The gamers also need to be aware that the Coconut must not be broken to avoid water leakage. Once the players successfully obtained a coconut, then they need to start the process of creating the flask. The process will take a few minutes to complete, and in no time, the gamers will find an elegant looking coconut flask in their inventory. They need to grab it and travel where they want. The best thing about this flask is that gamers can take it with them everywhere, and it remains filled all the time.

Once the gamers drink all the water from the flask, soon after, the players have to close it for a while, and it will be refilled back. It is one of the most necessary items of Stranded Deep as it allows gamers to move everywhere without being worry about getting thirsty or remain close to water bodies.
Conclusion
Stranded Deep is one of the most popular and oldest games in the segment of surviving games. However, it didn’t get the type of acclamation it expected since Beam Team Games have taken too long to come to PS4 and Xbox One.
Thus, the game has been forgotten by various gamers, and they have opted for other games of similar segments. However, the Stranded Deep version that has arrived recently is different and quite rare in features and aspects in contrast to its predecessor. Thus, we believe that soon more features and aspects will be included in it through new updates.
LAURA BARTON is a Norton product expert and has been working in the technology industry since 2002. As a technical expert, Laura has written technical blogs, manuals, white papers, and reviews for many websites such as norton.com/setup.

Monday, April 27, 2020

Fallout 76: Where to find the Wendigo Colossus

Fallout 76 came up with a new kind of creature monster Wendigo Colossus who is a part of Wastelanders update. This new monster is powerful and almost every player is willing to face off with it. Before fighting with Colossus, players have to know its location. Wendigo Colossus will appear in those areas where the atomic fire hit. Wendigo Colossus is now available on the random encounter location, and that is why players have to find this creature. Assault encounter areas in Fallout 76 are a lot, but Wendigo Colossus can be found only in two locations it can spawn. Most of the players have found Wendigo on the north side of Monorail Elevator. Another location is straight on the west federal disposal – Field HZ-21 at the map.
Both of these locations are placed in the divided south side, and these are great because both locations are near to each other and a single destructive weapon can be used in these locations in a single time. Without the guide, it is hard to find the Colossus, and that is why it is the guide from whoever encountered with it.

In the map, various type of lights exist, and among those lights, players need to focus on the blue light. Wendigo Colossus is available on the blue light marks on the map. There might be more enemies will available on the location, but there is no need to engage with them. Among the two locations in one Colossus will be available but if it is not available then wait and come back after some time. Keep repeating the procedure until Wendigo reaches to the location.
Respawn on the location will not take much time, so it’s possible to check if there is any requirement of exercise or checking the skills. Enemies on the location can also be engaged in the battle, but now it depends on the player if they engage with them also or avoid them in the battle. Engaging with other enemies will take much time, and there are no extra rewards for defeating the extra enemies. Wendigo is not available every time, so players have to check on the location multiple times if not find in the first attempt. After finding the monster on the map, players have to discover on their own how to defeat. However, the use of weapons and proper skills will not take much time to defeat this monster.
Conclusion
Fallout 76 is available in Play Station 4, Xbox One and PC platform. The popularity of the game is great, along with its new updates and tasks keeps the game more interesting. After this new update, almost every player is finding the Wendigo Colossal and in future players expect more updates like this.
Laura Barton is a creative person who has been writing blogs and articles about cyber security. She writes about the latest updates regarding mcafee.com/activate and how it can improve the work experience of users. Her articles have been published in many popular e-magazines, blogs and websites.

How to Modify Thick to Thin Provisioning in VMware?

VMware is one of the most useful aspects of the digital world as it allows us to adjust the size of the computer system. In this subsequent article, we will discuss specific ways to change thick to thin provisioning in VMware. The process is a bit complicated, so it is suggested to be aware while reading this article.
Through Vsphere Vmotion
In case you intend to modify thick to thin provisioning in VMware through Vsphere Vmotion, then you can opt to follow the below-mentioned guidelines.
  • Go to the virtual machine and turn off it on your system.
  • Reach the virtual machine and right-click on it.
  • You should select the ‘Migrate’ option.
  • Then select the ‘Change datastore’ option.
  • Navigate to the ‘Next’ option.
  • You have to choose a data store that is different from the one that’s recently in use.
  • Go to the menu of drop-down and choose the ‘Thin Provisioning’ virtual disk format.
  • Finally, click on the Next button and then select the Finish option.
  • When you select the Finish button, the conversion from thick to thin provisioning will begin.
  • Reach the ‘vCenter Server’ and choose the “Tasks and Events” view.

Through Storage Vmotion from Vsphere Web Client 
If the users are trying to modify thick to thin provisioning in VMware through storage Vmotion from Vsphere web client, then they should carefully apply the given steps.
  • Navigate to the virtual machine and right-click on it on your system.
  • Then select the ‘Next’ option.
  • You should click on the ‘Thin Provision’ for the preferred disks of the virtual machine and select the Next button.
  • Reach the drop-down section of ‘VM Storage Policy,’ choose a virtual machine storage policy, and select the Next button.
  • Go to the location of datastore wherever you want to save the files of the preferred virtual machine and choose Next.
  • The ‘Review Selections’ screen will bring up. Check all the shown details, and in case all is ok, then select the ‘Finish’ option.
Change Thin to Thick Provisioning
In case you intend to modify thin to thick provisioning in VMware through Vsphere Vmotion, then you can opt to follow the below-mentioned guidelines.
  • Launch the VMware Datastore Browser on your system.
  • After that, click on the ‘Power off’ button to move the preferred VM off.
  • Through the ‘vSphereClient inventory,’ right-click on that VM.
  • You should select the ‘Edit Settings’ option.
  • You will see a “Virtual Machine Properties” on your screen.
  • Go to the ‘Hardware’ section, and you will see the applicable hard disks list, sp choose the one you would like to convert.
  • Write down the “Disk Provisioning Type” section situated to the right-hand side can show if the disk is thick or thin.
  • Select the ‘Cancel’ option to close “Virtual Machine Properties.”
  • Then, navigate to the ‘Summary’ section for that VM.
  • Reach the ‘Resources’ tab, select the right click on the datastore wherever the preferred VM is situated.
  • You have to choose the option of ‘Browse Datastore.’
  • Go to the VM folder and twice click on it in sort to display the related .vmdk file.
  • Navigate to the .vmdk file. And right-click on it.
  • You should select the ‘Inflate’ option to change the disk’s provisioning within thin to thick.
  • Now, reopen the associated ‘.vmx file’.
LAURA BARTON is a creative person who has been writing blogs and articles about security. He writes about the latest updates regarding office.com/setup and how it can improve the work experience of users. His articles have been published in many popular e-magazines, blogs and websites.

Fixed: INVALID_SOFTWARE_INTERRUPT Error Message

The INVALID_SOFTWARE_INTERRUPT error is one of the most frustrating error messages on Windows 10 that can prevent a user from performing certain actions. If you are also facing the same message on your PC, then you are in the right place to get it solved. Read this article carefully to fix the error:
Solution 1: Running Blue Screen Troubleshooter on Windows 10
The Windows 10 comes up with built-in troubleshooting programs called Windows Troubleshooters. Even for several particular issues, Microsoft has provided dedicated troubleshooters for each kind of issue. In this solution, we are going to run the Blue Screen Troubleshooter to solve the INVALID_SOFTWARE_INTERRUPT error. Here are the instructions to run it:
  1. First of all, Windows Logo + I, keys should be pressed at the same time to trigger the Settings app on your computer screen.
  2. Head to Update & Security.
  3. Make your way to the option saying Troubleshoot using the left side panel.
  4. Now find the Blue Screen option located on there.
  5. Then make your way to Run the troubleshooter.
  6. Now let the process begin and complete.
  7. Once done, follow the onscreen instructions if there are any to solve the issue.
  8. Reboot the device.
Solution 2: Turn Off Automatic Reboot
It is one of the most effective ways to get rid of BSOD error, including the INVALID_SOFTWARE_INTERRUPT error. Follow the given below details to Turn off Auto Restart on Windows 10:
  1. Make a combination with the Start + D keys on your keyboard to jump to the home screen of your PC.
  2. Now make right-click on the THIS PC icon.
  3. Choose Properties.
  4. On the succeeding page, make your way to Advanced systems settings using the left menu.
  5. Once the System Properties window appears, head to Settings inside the Startup and Recovery sub-heading.
  6. Now draw your mouse cursor over the System Failure option and then unselect Automatically restart.
  7. Make your way to OK and then close the wizard.
  8. Reboot the device to see if the error persists.

Solution 3: Start into Safe Mode
The safe mode is capable of resolving the INVALID_SOFTWARE_INTERRUPT error effortlessly since it boots your system with minimum resources of your operating system. Here is how to make it happen:
  1. On the Start button, make a right-click and then choose Settings on the emerged list.
  2. As soon as it loads completely, choose Update & Security.
  3. Prefer Recovery using the left window and move to the parallel right.
  4. Slide down to Advanced startup part and hit on Restart now switch situated beneath it.
  5. Head to the Troubleshoot to go on.
  6. Navigate to the Advanced options and make your way to Startup Settings.
  7. Get to the Restart button.
  8. Afterward, push the f4 key to permit Safe Mode.
Solution 4: Deleting the Problematic Files and Patches
The problematic Windows Updates files, patches, and updates can sometimes create a buggy operating system that can lead to INVALID_SOFTWARE_INTERRUPT error code. So follow the below steps to fix them up:
  1. Hit on Action Center using the distant right on the Taskbar of your PC. 
  2. Make your way to All Settings.
  3. Once the Settings app comes into view, navigate to the Update & Security option, and then hit on it.
  4. Opt for Windows Update using the left side window and then shift to the adjoining right side.
  5. Select View update history and then head to Uninstall updates.
LAURA BARTON is a Norton product expert and has been working in the technology industry since 2002. As a technical expert, Laura has written technical blogs, manuals, white papers, and reviews for many websites such as norton.com/setup.

How to fix Ping Problems in Games on Windows 10?

Windows updates are intended to keep the users secure and updated, but in some cases, the users have reported facing high latency and ping issues after a recent update. So, if you are troubled with the same issue, then here are the instruction to fix the error.
Disable Windows 10 Delivers Updates
  • First of all, navigate to the Settings on your PC.
  • After that, click on the Update and Security tab.
  • You should reach the Windows Update option and select the Advanced options.
  • Go to the ‘Choose how updates are delivered’ and select it.
  • Then reach the ‘Updates from more than one place’ and disable it.
Stop Unnecessary Background Download
  • Navigate to the Settings on your system.
  • After that, reach the Network and Internet option.
  • Then select the Wi-Fi option.
  • Go to the Advanced Options button.
  • You should locate the Metered Connection and enable it.
Find the App through Network Connection
  • Hold the ‘Ctrl+Shift+Esc’ buttons over the keyboard to invoke the Task Manager.
  • After that, click on the Network option to order the procedures using network usage.
  • Now, locate the procedures that are using the network and disable it.
  • Also, you should reach to the Startup section and turn off these procedures within the starting using Windows 10.

Modify the Settings of Wireless Network Adapter
  • Reach the Wireless button on the lower left-hand side of the taskbar.
  • After that, click on the ‘Open Network and Sharing Center.’
  • You should click on the ‘Change adapter settings’ option.
  • Go to the wireless connection, and right-click on it, then select the Properties option.
  • You have to select the Configure option.
  • Now, select the Advanced section and modify the pursuing values and apply the settings.
Turn off Wi-Fi Sense
  • Hold the Windows and I buttons over the keyboard to invoke the Settings app.
  • After that, click on the Network and Internet tab.
  • Reach the Wi-Fi tab on the left-hand side panel.
  • Now, select the ‘Manage Wi-Fi settings’ and turn off all appropriate options.
Turn off Location Tracking Service
  • Go to the Settings application on your PC.
  • After that, go to the Privacy tab and click on it.
  • Navigate to the left-hand side panel and select the Location option.
  • Then select the Change option.
  • Now, switch the toggle of ‘Location for this device’ to disable it.
Conclusion
The article is about the ‘ping problems with games’ issue. Through the article, we will help users fix ‘ping problems with games’ issue. It is advisable to be aware while reading the article to avoid any mistakes while implementing these guidelines.
Laura Barton is a creative person who has been writing blogs and articles about cyber security. She writes about the latest updates regarding mcafee.com/activate and how it can improve the work experience of users. Her articles have been published in many popular e-magazines, blogs and websites.

How to Fix WMI Provider Host High CPU Usage on Windows 10?

We all know that Windows 10 is one of the excellent operating systems all over the world. However, several users complain that they suffer with WMI provider Host and high CPU usages. In this blog, we will teach you how to solve this issue with some simple troubleshoots.
Launch System Maintenance Troubleshooter
In case you intend to launch the system maintenance troubleshooter, then you can opt to follow the below-mentioned guidelines.
  • Hold the Win + R keys at the same time on your system to launch the Run section.
  • After that, input ‘msdt.exe -id MaintenanceDiagnostic’ into it and hit the Enter key.
  • You will see the System Maintenance screen on your PC.
  • Select the Next button and pursue the steps on the window.
  • Once you run the System Maintenance utility, look whether the issue is fixed.
Launch the System Performance Troubleshooter
If the users are trying to launch the system performance troubleshooter, then they should carefully apply the given steps.
  • Hold the Win + X keys at the same time and click on the Command Prompt within the list.
  • When you see the Command Prompt on your screen, input ‘msdt.exe /id PerformanceDiagnostic’ into it and hit the Enter key.
  • Now, pursue the on-screen steps to finish the troubleshooting.
  • Finally, once finish the troubleshooter, look whether the error still continues.
Through Event Viewer
In case you intend to fix the error via event viewer, then you can opt to follow the below-mentioned guidelines.
  • Hold the Win + X keys at the same time on your system and click on the Event Viewer within the list.
  • Once Event Viewer begins, reach the View menu and tick the box of ‘Show Analytic and Debug Logs.’
  • Go to the left-hand side panel and reach the ‘Applications and Service Logs’ option.
  • Then click on the Microsoft and then choose Windows.
  • Navigate to the WMI Activity option and then click on the Operational.
  • You should click on any applicable errors and look for additional detail.
  • Thereafter, check for the ‘ProcessId’ and remember its value.
  • Later, hold the ‘Control + Shift + Esc’ keys at the same time to launch the Task Manager.
  • After starting the Task Manager, reach the Services section and search through PID for every running service.


Turn off HP Software Framework Service 
If the users are trying to turn off the HP software framework service, then they should carefully apply the given steps.
  • Hold the Win + R keys at the same time on your system to launch the Run section.
  • After that, input ‘services.msc’ into it and hit the Enter key.
  • Then you will see an applicable services list on your screen.
  • You should find the ‘HP Software Framework Service’ option and twice click on it to launch its properties.
  • After launching the Properties screen, adjust the ‘Startup type’ to ‘Disabled.’
  • Thereafter, select the Stop option to prevent the service.
  • Once you have done, select the Apply and then OK button to apply the changes.
Delete Conduit Search
In case you intend to fix the error via delete conduit search, then you can opt to follow the below-mentioned guidelines.
  • Hold the ‘Control + Shift + Esc’ keys at the same time to launch the Task Manager.
  • After that, reach the Processes section and find the Conduit Search.
  • You should select and right-click on it then click on the End Task option.
  • Once you stop the app, hold the Win + I keys at the same time to launch the Settings application.
  • Go to the System tab.
  • Reach the left-hand side panel and click on the Apps and features option.
  • You will see the installed apps list.
  • Now, click on the ‘Conduit Search’ and select the button of Uninstall.
Turn off MultiPoint Connector Component
If the users are trying to turn off the multipoint connector component, then they should carefully apply the given steps.
  • Hold the Win + S keys at the same time on your system.
  • After that, click on the ‘Turn Windows features on or off.’
  • Then you will see ‘Windows Features’ on your screen.
  • You should find the option of ‘MultiPoint Connector’ and turn off it.
  • Once you have done, select the OK option to apply the changes.
  • Now, once you turn off the MultiPoint Connector, look whether the error is fixed.
Execute a Clean Boot
In case you intend to fix the error via executing a clean boot, then you can opt to follow the below-mentioned guidelines.
  • Hold the Win + R keys at the same time on your system to launch the Run section.
  • Thereafter, input ‘msconfig’ into it and hit the Enter key.
  • You will see the ‘System Configuration’ screen on your system.
  • Reach the Services section and tick the box of ‘Hide all Microsoft services.’
  • Go to the ‘Disable all’ option and click on it.
  • You have to select the Startup section and choose the option of ‘Open Task Manager.’
  • When you see startup applications on your screen, turn off the top app on the list by right-clicking on it, then select the ‘Disable’ option within the menu.
  • Now, redo the instruction for every applicable app.
  • Once you turn off every app, shut the Task Manager and return to the screen of System Configuration.
  • You should select Apply and then OK button to apply the changes.
  • Now, reboot the system.
LAURA BARTON is a Norton product expert and has been working in the technology industry since 2002. As a technical expert, Laura has written technical blogs, manuals, white papers, and reviews for many websites such as norton.com/setup.