Pages

Showing posts with label canon.com/ijsetup. Show all posts

Thursday, February 22, 2024

How to Resolve Canon Printer Error Code 5011? [3 Quick Fixes]

 Are you also facing Canon printer error code 5011 on your Windows 10/11? Well, you are not alone. Many like you have been facing the same problems for a long time. With this guide, beginners will get the reasons causing this error in Canon printers, including the effective solutions to resolve it right away.

Before you move to the fixes, you must know that this is the most common issue anyone can encounter on their Canon printers. But you are lucky that you’re here to get the accurate solutions. 

This guide will get your printer free from error code 5011. Coming to the methods, we will discuss the 3 troubleshooting methods: running a power cycle, inspecting the cartridge, removing the cartridge, and reinserting it. Let’s learn about the methods.

Why Does Canon Printer Error Code 5011 Occur?

Many common Canon printer models show this error code 5011. However, the most common issue we have noticed is a faulty scanner.

A defective scanner can prevent the smooth functioning of your printer. Proper troubleshooting is required to fix this error, which we will discuss later in this blog. In addition to fixing the error, you may need to replace the Printer Scanner to sort out the error.

Besides, the certain software failure of the device can also cause this error in your Canon printer. Besides, when your printer is not properly covered, then your printer quickly gets dust or garbage, which leads to obstructions in your printer. As a result, it shows the Canon printer error 5011.

In addition to causes, the faulty and inauthentic printer cartridge can also cause printer error 5100. Now, let’s head to the fixes to resolve Canon printer error 5011.

Fix 1: Perform a Power Cycle

The easiest way to remove error code 5011 in a Canon printerfrom your computer is to run a power cycle. However, you will need a new configuration after flushing all broken configurations.

To remove, perform the following steps:

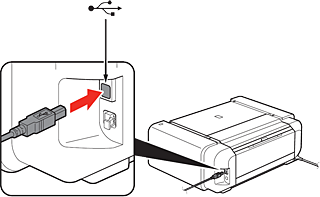
  1. Wait for three minutes before turning the printer on.
  2. Afterward, plug in the cables and turn it on.

Check if the problem is resolved. If the problem is still there, then try the below steps:

  1. Turn off the Canon printer again.
  2. Then, pull off the printer’s lid, including the scanner.
  3. After that, turn on the printer while the printer’s cover is open.
  4. After restarting the printer, close the printer’s cover. 
  5. Lastly, ensure that the problem is fixed.

Fix 2: Check the Printer Cartridge

The other common reason that leads to Canon printer error code 5011 is that your printer’s cartridge is stuck. Hence, users need to look into this.

However, following the fixes given below can help you resolve the error 5011 from your Canon printer:

  1. Firstly, switch off your Canon printer.
  2. Then, ensure no jamming due to paper or other objects in the cartridge. 
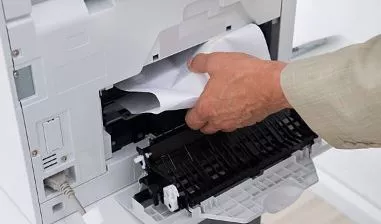
  1. Note that this error can be caused due to the small object as well. Thus, you must analyze the printer thoroughly.

Fix 3: Eliminate the Cartridge and Reinsert it

After trying all the above methods, if nothing worked for you. Then, don’t worry, we have another solution. In this method, we will try to remove and reinsert the cartridge.

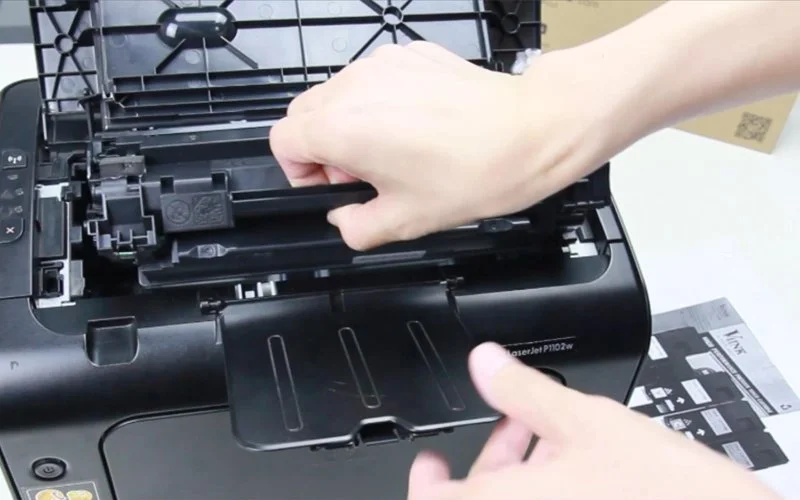
  1. Check if there are encoder strips on the backside of the printer.
  2. If you find any strips, you must remove them.
  3. You must always check if something is blocking your printer.
  4. If everything seems perfect, then place the cartridge in its place.
  5. Power on your Canon printer and check if Canon printer error code 5011 persists.

Conclusion

The Canon printer error 5011 can occur due to the paper jam, obstruction due to garbage and soil, and software breakdown. To avoid this error, cover the outer surface of the printer to prevent it from dust particles. Also, there are various solutions available to fix this issue. These solutions are power cycle, removal and reinsertion of cartridges, and cartridge inspection for any obstructions. All these methods can help you fix the issue. If not, then you have to contact Canon customer executives.

FAQs

Question 1: What is the Canon printer error 5011?

Answer: Error 5011 generally occurs in Canon printers due to the paper jamming obstructions in the paper feed and print heads area. Sometimes, faulty cartridges and software issues can also lead to this error code 5011. Various solutions can help resolve this issue; otherwise, users must contact customer service.

Question 2: How to fix 5011 error on Canon printers?

Answer: If you are facing the Canon printer error 5011. Then, you can fix it with the following methods:

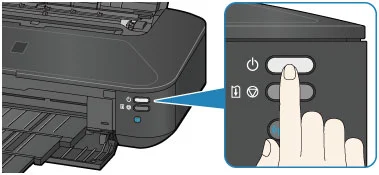
  1. Unplug the power cable from the printer.
  2. When your printer is off, press the power button 5 times.
  3. Afterward, plug the power cable again on its port.
  4. Then, switch on the printer.

If the above steps did not resolve the issue, then avail the service. Reach out to Canon support if your product is still under warranty.

Question 3: How can I remove 5011 error on my Canon TS9120 printer?

Answer: If your Canon TS9120 shows the error code 5011, then you have to perform the following tips to remove the error from your printer:

  1. First, remove all the cables, such as USB and power cord, from your printer.
  2. While the printer is off, press the button at least 5 times.
  3. Then, you have to plug all the cables after 60 seconds.
  4. After switching on the printer, check if the error persists.
  5. If it is not resolved, contact the customer support team.

Visit: ij.start.canon
ij.start.canon setup
canon.com/ijsetup
canon printer setup for mac
canon printer setup for Windows

Source: https://ijstartcanen.com/how-to-resolve-canon-printer-error-code-5011-3-quick-fixes/

Friday, October 7, 2022

How To Connect Canon Printer To Computer And Laptop?


Connecting a printer to a device isn’t a big deal in this new world of technology. And the Canon printer makes it easier with its innovative features and intuitive interface. This blog emphasizes the common issues while connecting a printer to a computer. You must know the right method to connect your canon printer. Despite being able to connect to the computer, people face many issues while setting up a stable connection. We understand their problem and work to provide a better solution. Let’s learn how to connect Canon printer to computer over wired and wireless connections.

After your printer is turned on, you can connect it to devices like a computer or laptop. When your device is ready for the configuration, connect the double-edged end of the power cable to the nearest outlet. But before connecting the printer to a device, you need to unbox your printer and assemble all the parts as given in the manual.

How To Connect Canon Printer To Computer Via USB Cable?

The easiest way to connect the Canon printer to the computer is via a USB cable. It’s the traditional method of connecting devices. One end of the USB remains connected to the printer, and the other must be connected to the computer’s USB port. The printer will notify you in just a few seconds that the connection has been built. However, to complete the connection, you need to install the software.

Once the installation is done, follow the on-screen instructions to continue the setup. To do this, follow the below steps:

  • Firstly, click the Windows Start menu.
  • At the left corner, you will see a gear icon; click it for Windows settings.
  • Then, you have to click the “Labelled devices” option.
  • Now, click on “Printers & Scanners.”
  • Then, you will be directed to a new page; there, you need to click on “Add printer and scanner.”
  • After that, the printer will start to scan for devices. Then you will see the name of your device on the screen. Click on your device name.
  • Lastly, follow the on-screen instructions to continue with the installation.

How To Connect Canon Printer To Computer Via Wireless Network?

Wireless connection is smooth to set up; however, it’s a little complex to set up. If you are unaware of how to connect Canon printer to a computer over a wireless network, confirm that you follow the given steps carefully:

  • When your device is ready for configuration, connect it to a wifi network.
  • You will see the available networks on the LCD screen of the printer.
  • Then, click on the setup page to configure the wireless LAN settings.
  • Now, you need to navigate the home network SSID.
  • To navigate the SSID, you take your mouse to the wifi icon at the bottom of the screen.
  • As another option, you can find the SSID at the bottom of the ISP’s router.
  • You need to type the network password while selecting the SSID.
  • After entering the password, the network will get ready for all printing processes.
  • Then, click on the Start menu.
  • Now, a gear icon will appear in the left corner.
  • And click on the “Labeled devices” option.
  • Then, click “Printers and Scanners.”
  • Then, you will be directed to a new page; there, you need to click on “Add printer and scanner.”
  • After that, the printer will start to scan for devices. Then you will see the name of your device on the screen. Click on your device name.
  • Then, follow the on-screen instructions to go with the installation.

How To Connect Canon Printer To Laptop?

If you have purchased a new laptop and want to perform multiple printing tasks with it, you will have to connect your Canon printer to your laptop, which is very simple. Still, many users face issues while connecting to it. So, we have made it simple for you.

Follow the given steps to see how to connect your Canon printer to your laptop. The steps are similar to a computer; we mentioned them specifically for the laptop:

  • Firstly, turn off your Canon printer.
  • Then, insert the double-end USB into the printer and USB port of the laptop.
  • Then, open the browser on your laptop.
  • Visit the Canon Pixma official website.
  • Then, download the printer driver corresponding to your printer model.
  • Now, go to the Windows Start Menu at the bottom left side of the screen.
  • Then, launch the control panel and click on “Hardware and Sound.”
  • Click on the “Devices and printers” option.
  • Now click “Add a printer” and select Local printer from it.
  • You need to choose a printer port from the given port list.
  • Click “Next.”
  • Select yes if you want to keep the Canon printer as the default printer.
  • Lastly, click the finish tab to end the process.

If you can still not set up a connection, we advise you to check the internet connection, change the power outlet, and go with the instructions mentioned in the manual.

Visit: ij.start.canon setup
ij.start.canon

Source: https://ij.ijstartcam.com/how-to-connect-canon-printer/

Monday, April 11, 2022

Fixed: Netflix HDCP Unauthorized, Content Disabled’ Error


When you play any Netflix content on streaming devices such as Roku, Amazon Fire Stick, or Roku Streaming Stick, you may face an ‘HDCP unauthorized, Content Disabled’ error. It is due to the hardware issue wherever the device can’t play secured content. So, if you are facing this error, here are a couple of fixes given below.

Run Power Cycle to Netflix Error

If you are unable to run the power cycle on your device, then pursue the entire on-screen directions provided below:

  1. Firstly, detach the Amazon Firestick through the TV with the source of power.
  2. Then allow the device to idle for a moment.
  3. Optionally, you can also switch on and off the TV.
  4. You should connect the TV again.
  5. After that, switch on the devices through the remote of the device.
  6. Now, launch Netflix and look for any improvements.

Check for HDCP Problems to Netflix Error

If you are unable to check for HDCP problems, then pursue the entire on-screen directions provided below:

  1. Don’t forget to use an HDMI cord and look for any loose connection.
  2. After that, check the device to link correctly to the TV.
  3. You should attempt reversing the HDMI cord then connect again.
  4. In case the TV has several HDMI ports, attempt attaching to another HDMI port.
  5. If you are using several TV’s tries attaching the device to a different Tv through HDMI.
  6. If the device works correctly, then the problem can be with the TV’s HDMI port.
  7. Now, if the device doesn’t work on both TVs, attempt modifying the HDMI cord.

Turn off Auto-Adjust Display Refresh Rate to Netflix Error

If you are unable to turn off the Auto-Adjust display refresh rate, then please pursue the entire on-screen directions provided below:

  1. Hold the Home key on the remote of Roku.
  2. After that, click on the Settings button.
  3. You should click on the System then choose the ‘Advanced System Settings,’
  4. Go to the ‘Auto-Adjust Display Refresh Rate’ and click on it.
  5. In case the toggle is already set to Enable, then click on it to disable it.
  6. Now, shut the Settings screen, then look for any improvements.

Setup the Samsung TV for HDR to Netflix Error

If you are unable to set up the Samsung TV for HDR, then pursue the entire on-screen directions provided below:

  1. The users keen to set up the Samsung Tv for HDR; can determine to follow the directions given below.
  2. Hold the button of the Menu on the remote.
  3. After that, reach the Picture option and choose the Picture Options.
  4. You should click on the ‘HDMI UHD Color.’
  5. Now, adjust it to ‘On’ then reboot the TV.

Setup the LG TV for HDR to Netflix Error

If you are unable to set up the LG TV for HDR, then pursue the entire on-screen directions provided below:

  1. Hold the Home key and choose the HDMI option.
  2. Then reach the Settings option and select the Advanced button.
  3. You should click on the Picture.
  4. After that, switch the toggle of ‘HDMI Ultra DEEP COLOR’ to enable it.
  5. Now, reboot the TV.

Setup the Sony TV for HDR to Netflix Error

If you are unable to set up the Sony TV for HDR, then pursue the entire on-screen directions provided below:

  1. Go to the remote and hold the Home key.
  2. After that, select the Settings option.
  3. Then choose the ‘External Inputs’ option.
  4. Reach the ‘HDMI Signal Format’ option.
  5. You should click on the HDMI option then select the Enhance Mode option.
  6. Now, the TV will restart automatically.

There may be several reasons behind the Netflix HDCP unauthorized, content disabled error. Try following the steps given above to fix the issue.

Visit: ij.start.canon

canon.com/ijsetup

Source: https://justcustomerhelps.wordpress.com/2022/04/11/fixed-netflix-hdcp-unauthorized-content-disabled-error/

Monday, August 2, 2021

How to Resolve Canon Printer “Check Ink” 1486 Support Codes In Few Steps?

Canon printers are globally known for their high-end printing features. Not just high-end features, but over the years, users have received great customer service. With being a user-friendly printer brand, it has provided range f varieties in the printer as well. However, machines are bound to face glitches in software or hardware. Despite the prestigious brand and being user-friendly, the printers often display error codes. These error codes do not represent your investment was a waste. 

They simply show issues occurring inside your printer, which pretty normal for machines after being used for some time. If your printer detects that something is cooking up inside it, you will be able to see the signs like the constant blinking of the printer lights. Automatically shut down during the printing process, or it will make a funny noise. And sometimes, it will prevent you from printing or scanning the documents. 

There is no permanent solution, as these error codes are not permanent problems. But in order to prevent these error codes from occurring too often, you can try some of the basic solutions. You can try to clean and maintain your printer from inside once in a while, or you can do it once a week month. If you are dealing with a busy work schedule, then you can call a tech expert for service and maintenance. Here, in this blog, we will discuss the causes behind the error code 1486 as well as the solutions. 

How to identify the issue occurring behind the error code 1486?

Before you step into resolving the problem, you should always examine why it is happening. It is necessary to apply the solution correctly. Randomly applying the remedy can further lead to the destruction of your printer. And will cost you even more, and you may end up buying a new printer. So, it is better to be secure while applying the solutions. Here, the error code 1486 or “check ink” symbolizes the cartridges issue emerging in the printer. This means your printer is having a hard time detecting one or more cartridges, which probably indicates the incorrect installation of the cartridges. 

However, one thing is for sure that you can resolve the issue without any problem with a few instructions, and especially an easy one. There are things, which should be kept in mind if you are not familiar with the printer. The slots designed in the printer have an excessive similarity. Also, the Canon Fine cartridges include a similar look inside the printer. Despite the fact of similar slots, the printer requires one color and one black cartridge to be installed inside the printer. It does not matter if you are thinking of working with one of them. 

Now we should move to the tips that can help you clean the error code from your printer. You need to carefully go through each step and apply it to the printer. Do not rush the process, as you cannot expect your printer to be up and ready for the printing process in seconds. Let’s see what the solutions are.

https://ijstartcanon.wordtypo.com/how-to-resolve-canon-printer-check-ink-1486-support-codes-in-few-steps/

How to clear the “Check Ink” or 1486 error code from the Canon printer?

In order to stop the Canon printer from displaying these error messages constantly, you need to follow these instructions. Follow these steps and resume your printing jobs in few steps. 

Step 1: Remove the Cartridges from the Printer

If you are in luck or case it is detectable, your printer software will display the cartridge, which is causing the problem. And if your printer has not revealed the cartridge that is creating the problem, you need to take out both the cartridges gently. Now you have to troubleshoot both the cartridges to resolve the error code. 

Step 2: Examine the Cartridge Codes

In this step, you need to check the codes given on the labels of the cartridges. It is important to make sure that you have one of each, which means one black and one color cartridge. In case if you are unable to recognize the particular label about which one is color or which one is black, or if you do not know which cartridge is compatible with your printer. Then you need to check in with Google about the model number, or you can check the manual. 

The print heads given under the cartridges can help you recognize which one is black or which one is color. The color print head includes three separate lines in the central metallic plate, and the black one includes a single but long line. 

Step 3: Reinstall the Ink Cartridge 

Once you have taken out both of the faulty ones, you might as well clean them. After you have checked it and made sure they are correct. You need to reinstall it back in the printer in its same position carefully. Do not rush the process, as you may get the error code again. You also need to look closely at any kind of markings appearing on the body of the printer or on the cartridge to make sure they are perfectly installed in their position. 

Now your printer will be able to recognize both of the cartridges, and the error message will be gone from the printer. 

Visit: ij.start.canon

Source: https://luzelectronicsandtechnology.wordpress.com/2021/08/02/how-to-resolve-canon-printer-check-ink-1486-support-codes-in-few-steps/

How to Remove Canon Printer Error Code 6A80 With Effective Methods?


If you are struggling with the error code 6A80, this is the right place to get your answer. Canon printers often display some of the common errors from time to time. This implies that there is basic information, which should be memorized by you. These common errors mainly occur due to the internal issue emerging in the printer, which involves paper jams, empty ink tanks, or something else. And this is pretty normal for machines after being used for a while. 

However, no matter how harsh a situation seems, you can easily remove the error code all by yourself. But, of course, it will be possible with a little assistance. Here, in this blog, you will find a range of effective methods, and most importantly, you can easily understand them. But before we look into the solutions, we should find out why exactly this error code interrupts your printing jobs. 

Causes of the error code 6A80 occurrence in your Canon Printer:

Error code 6A80 is one of the common errors that often show up in your Canon printer. And Canon users have also reported the error code problem more than usual, and due to reasonable cause. While working professionally or personally, if you are commanding your printer with heavy hours printing jobs, your printer will display the error code. However, when an error code occurs, there are several causes behind it. And here, we will discuss other possibilities of the error code 6A80 in your Canon printer.

Other possibilities of the error code 6A80 occurrence:

Usually, this error code occurs after being used for more than usual hours or after being used for some time. But it includes other factors that can be related to the software or hardware problems. Let’s see what they are:

  • Malfunction in the print head.
  • Clogged situation of the cartridge nozzles.
  • Improper printer settings.
  • Paper jam.

Now, you will need to find out what exactly is causing the problem in your printer and if it matches with any of the above reasons. When you have spotted the reason in your printer, then you can apply the solution according to the suggested solution. Do not move further ahead on your own without properly investigating the causes of the error code. Now that we have discussed the causes, let’s see what the solutions are.

Error Code 6A80: How can you resolve the emerging issues in your printer?

You will find multiple solutions, and not just one, which gives you the liberty to try each method. In case one does not work on your printer, then try the other one. Apply one of these solutions, and get rid of the problem by yourself without needing the help of an expert. Ignorance towards the error code can be proved as a disaster for your printer and can damage the printer from the inside. Follow the given methods according to the suggested steps. 

How-To-Remove-Canon-Printer-Error-Code-6A80-With-Effective-Methods

Method 1: Moving the Print Head

In this method, you need to access the printer manually. You will need to open the printer and locate the cartridge carriage. Once you have found the carriage, you will need to move the cartridge carriage from the left to the right side, and then vice versa. Do this about three times, and make sure that they are moving freely. When you move them, the cartridge will disperse the movement, and it will get smooth. This will immediately resolve the error code with this effective method. 

Method 2: Clean the Cartridge Nozzles

Sometimes, the cartridge nozzles create a problem and get blocked due to excessive use. This issue especially causes problems in the printing jobs and leads to error codes. But you can resolve it manually. In this method, you will need to move the brush, which will clean the cartridge nozzles given on the right side of the printer. This is the exact place where the ink cartridges are placed. However, you have to attempt the step gently and not damage any part of it.

Method 3: Removing Paper Jam

For your printer, it is possible to collect the remaining pieces of paper, which leads to the paper jam. To resolve the paper jam issue, you will need to clean the paper tray. Also, you will need to look inside the printer, if there is any stuck and causing the blockage. You will need to remove dust particles and papers while wearing gloves.

Method 4: Reset Your Printer

When everything fails, you can easily adapt this method, as it works all the time. Sometimes your printer needs to cool down and a newer process to work again. And resetting your printer is the best way to do that. In this method, you will need to switch off your printer and press the ‘black photocopy + stop/reset + on & off button at the same time. Then release the on and off button, and while your printer starts, you should release all the buttons. Once you have done this, start the printer from the beginning, and check if the error code still exists. 

Visit: ij.start.canon

Source:https://luzelectronicsandtechnology.wordpress.com/2021/08/02/how-to-remove-canon-printer-error-code-6a80-with-effective-methods/