Adding Watermarks to your created content is a way of protecting your document from others to use it in their name. Google Docs does not have an inbuilt feature for this, yet there is a way we could add watermarks in Google Docs. Here is how you can do so:
Inserting Watermark within Google Docs
For creating a watermark in Google docs, you firstly need to create a transparent layer of a background image with your watermark on it.
The steps to perform this are:
- Open a document in Google Docs.
- Go to the ‘Insert’ tab in the toolbar on the top of the screen.
- Tap on ‘Drawing’ and then select ‘New.’
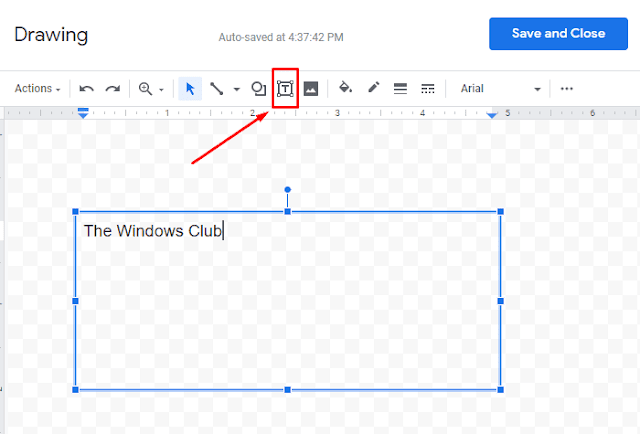
- To create a watermark, you can add text or a logo according to your need.
- For adding text, select the ‘Textbox’ icon from the toolbar. Drag on the document with the help of a mouse and form a box. The size of the textbox depends on your requirement.
- Once you form a text box, you can place it anywhere you want.
- You can also customize the font colour, font size, font type, and much more from the ‘More’ tab.
- If you want to re-size the text box, drag the square icon that appears in the middle of the line and re-adjust.
- Once you’re done, tap on the ‘save’ button to make the changes.
Inserting Watermark Texts within Google Docs?
You’re allowed to add watermark text either in the header or the footer area. For doing so:
- Select ‘Headers and Footers’ option in the ‘Insert’ tab.
- Follow the three steps: Insert tab > Drawing > From Drive.
- On next page, click on the ‘Select’ button and select items you want to set as your watermark.
- The ‘Insert Drawings’ pop-up menu will appear. Select ‘Link to Source’ if you’re going to set a watermark link. But, if you want to add without any link, go for the second alternative and tap ‘Insert.’
- Three options will appear when you create the watermark text. These are:
- Wrap Text – This option forms a text boundary around the watermarked object.
- Inline –Docs, as a matter, of course, puts the content wrapping in this form. It recommends that the additional drawing goes about as a piece of the content, and along these lines, it can’t be unreservedly set on page.
- Break Text – Choosing this choice, the content gets place above and underneath the item. It separates the sentences where you embedded it.
LAURA BARTON is a Norton product expert and has been working in the technology industry since 2002. As a technical expert, Laura has written technical blogs, manuals, white papers, and reviews for many websites such as norton.com/setup.


No comments:
Post a Comment